
Flash 5 - Part 3: Basic drawing
Introduction
Well, let's kick off with some more interactive fun in this article. Load up Flash 5, close all those pesky panels until you have only the Work-area ('Scene' or 'Stage' or whatever you wanna call it) and the Tools panel.
This article will take you through some basic editing and drawing.
Your first shape :)
Let's get started with a simple box on the work-area.
Click on the RECTANGLE-Tool to select it, Click on the COLORS bucket colour to bring up the colour window then draw a square on the work-area. Now draw a second overlapping rectangle on the work-area.
Arcs and Vertex moving
Click and drag the mouse to bend the straight line into an arc, then release the button.

Move the cursor over a corner vertex of the shape. Note that the cursor has changed into a vertex tool. By clicking and dragging a vertex you will distort the polygon (both the edge strokes and the interior fill region).
You can switch to the SUBSELECT-tool to perform similiar editing effects, but will have the advantage of seeing the control-points and vertex handles.
Selecting
Select the ARROW-tool and click once inside the shape. This will select only the interior fill region of the polygon.

Double-Click on the inside Fill shape. This will select both the Stroke and the Fill shape - like this:

Double-Click on the Stroke will select ALL the touching stroke lines around a shape.

You can also select a square region of the shape in the normal Windows drag-surround method. This will select everything inside the region including parts of a shape. The LASSO-tool allows you to draw a free-form region.
Hold [SHIFT] down to select (or de-select) multiple shapes.
Slicing and Intersecting Shapes

You can delete the red Stroke line and Flash will merge the Fill areas back into a single shape.
Moving and Merging
As soon as you DE-SELECT a dragged shape it will MERGE with any other shape which it touches and/or overlays. This can take a little while to get used to. Its most useful when drawing some odd-shaped items with parts cut out or joined together with other shapes.
Click and drag a shape (eg. a polygon) away from the other shape and you will see that it leaves a gap!
Tip: Moving and Merging 2 - Single Fills
Stroke and Bucket Fill
You can change the Stroke and Fill of a shape in a number of ways. Perhaps the most obvious is to use the INK-BOTTLE-tool and PAINT-BUCKET-tool and click on each shape that you wish to change the colour of.
Another way is to select the shape (or shapes) then choose the fill color.
Gradient Fills
(Flat polygons suck ;)
Once you have got a shape, Select it and bring up the Fill panel and select either Linear or Radial gradient fill.
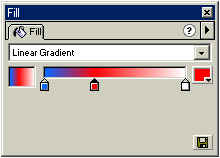
You will notice we have a number of little slider-controls under the gradient preview bar. These define when and where a particular gradient sweep section starts. To change a color, select a slider and use the Color drop-down icon.
TIP: Keep the Mixer panel open too. It makes creating hilites (and shadows) much easier because you can edit the Alpha of each gradient slide-control. If it does seem like you are not able to change the Alpha, then remember to select the Fill option on the Mixer panel.
Transforming Gradient Fills
You might wonder why your linear gradient fill always goes from left to right and might want a vertical gradient instead.
This is where the 'Modifiers' icons come in. Click the Fill Bucket (if not already selected) and hit the small 'Transform Fill' icon on the Tools panel. Now click your shape and notice some strange handle-controls appear.
Linear Fill - transform
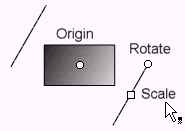
The controls above should be pretty straight forward to understand. The two parallel lines represent the linear gradient direction and scale and the middle handle is the centre origin point where the fill starts from.
Radial Fill - transform
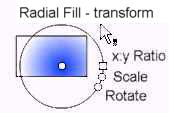
Again, the handles should be obvious. The nice thing about radial fill it that it can be squashed into an ellipse shape too by changing the x:y ratio.
Layers
These are one of the most useful features of Flash. Not only can you overlay items in a particular Z-order, but you can use them to arrange shapes without the problem of them merging together or cutting apart.
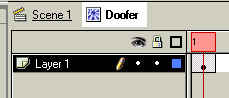
Click on the 'Insert Layer' button below the timeline/layers window. Now draw a new shape on the newly created layer. Now click on the Layer's name bar and drag it below the first layer.
Clicking on a shape in the work-area will select that particular layer, this can be useful when you don't know which layer an item is on.
Clicking on the layer's name will select EVERY item on that layer.
I will explain the Time-line and Layers in more detail in the next article.
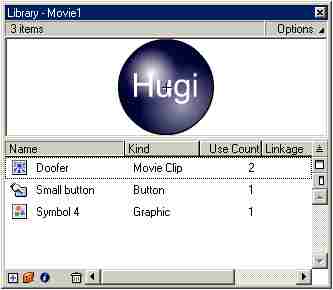
Symbols and the library
Select a shape (or part of a shape), then Insert --> Convert To Symbol. Give it a name and set its behavior to Movie-clip.
You will notice that clicking on the shape will not hilite it, but will hilite a blue-box around it. This means its an Instance of a Symbol. If you explore the library (Window--> Library) you will see that the shape is in there.
Drag a copy of the shape from the library onto the work-area. Use the OPTIONS:Scale on the Tools-panel to resize the instance. You can add rotated and skewing by using the 2nd modifier (OPTIONS:Rotate).
Editing Symbols
You can edit symbols in three ways, either double-click on the Instance on the work-area (this will 'Edit in place'), right-click and choose either 'Edit' or 'Edit in place' or right-click in the library window and edit the symbol.
Let's Double-Click on the Instance. Notice that the Symbol's name has appeared at the top of the screen next to the 'Scene 1' text. Also the rest of the work-area has been faded out to white. Change the appearance of the shape by choosing a new color or by distorting its Stroke shape. You should notice that every Instance of the symbol also changes.
Click on the 'Scene 1' text or double-click on the white work-area to return back to editing the main scene.
Right-click menus
Try clicking the right-button over the work-area or time-line and you should see a list of contextual options. Perhaps the most useful ones are Edit-in-place, Paste-in-place and Panels.
You should be careful to remember that the time-line and the main work-area are two DIFFERENT windows and so have their own, unique context menus. For example, the time-line allows frames to be cut and pasted, where as the work-area allows shapes/instances to be cut and pasted. It's sometimes too easy to mix these up. But thankfully Flash has a nice system of UNDO'es ;)
In-place
You will often find you need to duplicate Instance or shapes on different keyframes and/or inside different symbols. You could use the INFO-Panel and position them yourself, but the Paste Iin Place function saves time.
Closing words
Well, thats the basic drawing out of the way. Next we'll look at the Time-line with it's KeyFrames, Frames and Layers.
Happy Drawing